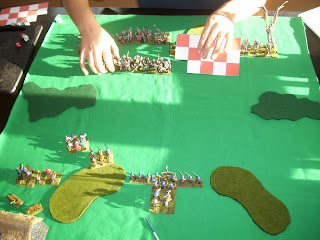
My plan was to push shooters and warband into the forest on my left as a holding action and use my right wing of the Strathbogie with mounted as the hammer. Here Bob advances his bony boys into the mill:

And I try to get warband and shooters into the woods on my left, I started with lousy pips so the development was slow:

Once I reached the woods, I could not resist the opportunity to jump forward with Highland warbands into the hordes (nice matchup with quick-kill in my favour) and blow a hole:

And behind this skirmish I tried to develop the right. All the while, I was mostly concerned with his flyer (still not active):

Eventually I was able to start forcing the right flank more and more, I don't remember why it took so long for Bob to take flight, but I think he was busy working my left with his bow elements and I was losing ground there. But the right flank matchup with my pike and shot versus his knights was what I was after:

Bob popped the flier who helped to outflank my left, but I was able to shoot him down from the woods with my last stand of Irish shot. Here we see my left has collapsed but the right has developed nicely and I have position to turn his general:

And eventually this is what happened, fortunately the dice were kind too (my 4 to his 1):

Game 1 was very close (11G:10). They don't come much closer.
Game 2 saw the positions reversed with Bob as defender. I looked at his deployment and decided to refuse my right and infiltrate and overlap his left by forcing warband and shooters through the woods, perhaps with a Stronghold assault to decide the outcome:

I had lots of pips to start and developed as planned. But my refused right was a concern, and the flier worried me. I kept my general back as a reserve and ZOC to limit his ability to outflank me. In hindsight, I should have used MacColla for this. As a hero he is better able to counter fliers and has lots of mobility. This tactical error would be my undoing.

The left flank attack worked well despite Bob's knight reinforcements, I had enough pips to engineer the match-ups I wanted:

And eventually I killed the entire left, but I was left in disarray with all of my shooters unable to support my right and the threat of the flier. Then it happened, the flyer jumped my right with a supporting knight and I foolishly allowed my general to be taken in a flanked position.

At that time, I was just ahead or even on AP killed so the game did not end immediately, but the next turn Bob regenerated some dead hordes and killed off another highlander warband, so we were defeated. This ended up something like 8G:6. My downfall was my poor aerial defence on the right. My army composition and game strategy were fine, just tactically I goofed and let the flyer grizzly-rape me. Bah! Bloody good fun though. Bob and I agree, if I could only ever play one game for the rest of my life, shipwrecked on an island with one rulebook, it would have to be HOTT.
Nice pictures and a fun game. I'm not sure how to counter the shooters in the woods. Maybe get in there with two lurkers? Or just push the bow into contact with them?
ReplyDeleteI think you either need to go in and root them out, or stay out of range. But yes, a lurker or two can really unhinge things as well.
ReplyDelete